Monday, January 30, 2012

Bruschetta Chicken Pasta

I recently received a request from a very dear friend for a recipe for a comfort food that is dairy-free.  (No cheese? ... Could be tough, but I like a challenge).  So I started thinking about what comfort food I could come up with that didn't include dairy.  For me, comfort food is definitely pasta.  I. LOVE. PASTA.  It makes me smile - I don't know why, it just does.  It makes my belly full and happy.  It is oh-so satisfying.  And it is the perfect one-pot meal.  Happy belly + one dish = Happy me! But boring pasta and tomato sauce just doesn't cut it.  That isn't comforting... That leaves me wanting something else - something more satisfying.  I remembered going to T.G.I. Friday's awhile back when I wasn't feeling well, and ordering their Bruschetta Chicken Pasta.  I remembered liking it... a lot! It must have done the trick, because I still remember how satisfying and delicious it was! So I figured I'd try to recreate this delightful dish for my friend's enjoyment (and mine, too, of course!).  I think this has become a new favorite! It is AH-MAZING! Enjoy it!


Servings: 4
Weight Watchers PPV: 10


Ingredients:
Bruschetta mixture:
- 2 large tomatoes, diced
- 2 Tbs. minced garlic, divided
- 1/4 cup fresh basil, slivered
- 4 tsp. olive oil, divided

Balsamic glaze:
- 2/3 cup balsamic vinegar
- 2/3 Tbs. sugar


- 1 chicken breast
- salt and pepper

- 1/3 cup tomato sauce
- 8 oz. dried pasta (I used cavatappi)


Two hours ahead of meal time, combine diced tomatoes, 1 Tbs. minced garlic, 2 tsp. olive oil, and basil.  Cover and refrigerate.


To make balsamic glaze, combine balsamic vinegar and sugar and heat in small sauce pan until boiling.  Simmer until reduced by 3/4, and until a thick syrup forms.  Remove from heat and reserve until ready to serve.


Cook pasta according to box directions until al dente.  Meanwhile, season chicken with salt and pepper.  Grill until no longer pink.  (I used the George Foreman).  Slice into desired size pieces, or shred.


Heat 2 tsp. olive oil in large pan over medium heat.  Add garlic, and cook for one minute or until fragrant.  Do not burn.  Next, stir in bruschetta mixture made earlier and heat for several minutes.  Add tomato sauce, and bring to a boil.  Reduce to low.  Stir in cooked pasta and chicken and stir until heated through.  Serve with balsamic glaze drizzled over each serving.


Saturday, January 28, 2012

Mint chocolate chip cake

My new favorite love is mint and chocolate.  A friend of mine recently introduced me to Starbucks Peppermint Mocha, and I have to say, I'm OBSESSED!  I find every possible excuse to stop by and enjoy one of those deliciously tasty treats.  And of course, the liquid form is not the only way to enjoy this perfect marriage of flavors. My Christmas cookie feature this year included Andes Candies cookies! Seriously... mint and chocolate are the perfect combination (well, equal to chocolate and peanut butter!).  They are the perfect end to a satisfying meal (a la Olive Garden), or a perfect addition to a dessert table.  So when my Aunt asked me to bring dessert, I knew I wanted to try something using this delightful duo.  


I came across a recipe for mint chocolate chip cake from raspberricupcakes.com.  This is my adaptation - I hope you find it as delightful as I do! 


** I'm not including WW points plus value for this one... I don't want to know **

Ingredients and directions for cake batter:  
Cake batter:

- 1 stick butter, room temperature
- 1.5 cups sugar

- 9 tsp. cocoa powder
- 1.5 cups flour
- 1.5 tsp. salt
- 1 tsp. baking soda
- 1/4 tsp. baking powder
- 2 eggs, room temperature
- 1/2 cup coffee, mild
- 1/2 cup milk
- 1 cup Andes Candy pieces

Pre-heat the oven to 350*.  In a mixing bowl, whisk together cocoa powder, flour, salt, baking soda, and baking powder until well combined.


Using a stand mixer, beat the butter and sugar until its smooth and fluffy.  Add the eggs and continue beating until well combined.


Next, beat in half of the dry ingredients, followed by the milk and coffee.  Once well combined, beat in remaining dry ingredients until thoroughly combined.  Mix in Andes Candy pieces using a wooden spoon.


Grease two Springform pans.  Pour half of the batter into each of the pans.  Bake for 20-25 minutes, or until a toothpick inserted into the center of the cake comes out clean.  Remove the sides of the pans and flip upside down onto clean towel.  Allow to cool completely.


Ingredients and directions for icing:
- 2.5 sticks of butter, room temperature
- 4 cups powdered sugar, whisked
- 2 tsp. peppermint extract
- 1 large bar of dark chocolate
- Green food coloring


In the bowl of a stand mixer, beat butter until smooth.  Add in one cup of powdered sugar at a time, until well combined and fluffy.  While its beating, chop chocolate bar in food processor.


Add the chocolate pieces and peppermint extract into the mixing bowl, and beat until well combined.  Add food coloring to achieve desired green color.  Remove bowl from mixer, and mix by hand to ensure color is evenly distributed.


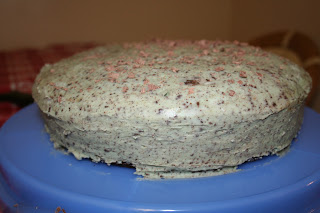
On a cake platter, place one layer of cake.  Using 1/4 of icing, evenly spread icing across the top.  Place the second layer of cake on top.  Evenly spread remaining icing across tops and sides of cake.  To achieve a smooth look, wet your icing spreader with hot water and run across your icing until smooth, wetting spreader frequently.  I topped with chocolate curls for a little decoration.


Enjoy!

Wednesday, January 25, 2012

DIY Laundry Detergent

Since I haven't been working a full time job in quite awhile, I've been trying to be creative with ways to save money! I hate saving money... I like spending it! I know we all do, but really, I get some sort of satisfaction from shopping that is un-met by other pastimes.  However, whenever I get to spend money in order to save money, that makes me happy too! Like today, I decided to try my hand at making laundry detergent.  I figured, I'd get to shop to find the ingredients, but the husband should be happy because it will save us a LOT of money in the long run! ** Note: I did use this for several loads of laundry, and I'm very pleased! Everything seemed super clean, and smelled like a fresh breeze :)  It has a very light scent, so if you like your laundry to have more of a scent, I'd add laundry crystals, but for me, it was perfect! **

Ingredients:
1 bar Fels Naptha
3 cups Arm & Hammer washing soda
3 cups Oxyclean (or store brand equivalent)
4 cups Borax
1 pound box baking soda

Grate the Fels Naptha either in a food processor, or with a hand or rotary grater.  I used a cheese grater for mine.  It worked great, and then it looked like this: (and don't worry, it will dissolve in the water!)


Next, mix in washing soda, Oxyclean, borax, and baking soda.  Make sure you evenly mix all ingredients.  You are now ready to use it! Use only one tablespoon per load, as this recipe is very concentrated! Hope you enjoy the spending to save as much as I did!!!

Tuesday, January 24, 2012

Tomato basil soup

So... it happened! My first blog request! (And let me tell you how excited I am to have a request - it's so nice to know someone other than me is reading this blog!).  And what a good request, indeed! This is the perfect time of year for soups! In fact, my Weight Watcher's meeting group just did a soup swap! This is the recipe that I shared with the other members, and it got rave reviews! If you are a fan of serious tomato soup, you should definitely try this recipe! It is super easy and quick, but tastes fantastic! I hope you enjoy!!!

Servings: 4
WW PPV: 3

Ingredients:
- 12 oz. tomato juice
- 28 oz. crushed tomatoes
- 8 oz. tomato sauce
- 3 heaping tsp. minced garlic
- 3/4 cup fat free half and half
- 1 tbs. light margarine
- 1/4 cup chopped basil

Start by combining tomato juice, crushed tomatoes, sauce, and garlic in a soup pot.  Bring to a boil, and then reduce heat to medium.  Cover, and let simmer for 30 minutes.  Once it has been slightly reduced, remove from heat, and mix in half and half, margarine, and basil.  Re-cover, and let stand for several minutes.  (Do NOT let soup boil once you add the cream!).  Mix thoroughly until well combined.  I like to serve mine with a few croutons on top, and a sprinkle of parmesan cheese.  And of course, I made a yummy grilled cheese sandwich for dipping to go along with it! 


Tuesday, January 17, 2012

Garlic cheddar biscuits

There are certain restaurants that I go to because I enjoy the atmosphere or the service.  There are other restaurants that I go to because their food is so good.  And then sometimes, I go to a restaurant because the "complimentary bread" that comes with my meal is so unbelievably delicious and addictive, I always take some home for later!  Red Lobster is one of those places.  Personally, I am not a huge seafood fan, and they only have a few non-seafood dishes, but when someone suggests going there, I immediately get hunger pangs for those cheddar bay biscuits!  

Thanks to Pinterest, I have found a recipe that very closely resembles those amazing biscuits.  If you are a fan, you HAVE to try these!  The best part is, this recipe uses a mix, so they are super easy, and super quick to whip up.  Seriously, at your next dinner, serve these.  While your families' mouths may be too full of biscuit-yumminess to say it out loud, their eyes will shout a resounding THANK YOU!

Adapted from gimmesomeoven.com

Ingredients:
- 2 cups buttermilk biscuit mix (i.e Bisquick, Jiffy)
- 1 heaping cup reduced-fat shredded cheddar cheese
- 3/4 tsp. garlic powder
- 1/2 tsp. salt
- 2/3 cup fat free milk
- 2 Tbs. butter
- 2 tsp. dried oregano
- 1/2 tsp. garlic salt


Preheat your oven to 400*.  Spray a baking sheet with non-stick spray.

In a mixing bowl, combine biscuit mix, cheese, garlic powder, and salt until cheese is well coated.  Next, stir in the milk, and stir until thoroughly combined, forming a sticky dough.  


Next, use your hands to form the dough into 12 biscuit-shaped rounds and place onto baking sheet (if the dough is too sticky and sticking to your hands, coat your hands in a little bit of flour).  Bake in the oven for about ten minutes, or until lightly browned.  

While they are baking, melt the butter, and whisk in the oregano and garlic salt.


As soon as the biscuits come out of the oven, brush the seasoned butter evenly onto the tops of each biscuit.  Allow to cool for a few minutes before serving.  Be prepared for "ooohs" and "ahhhs".  Enjoy!


Barbeque Chicken Pasta

What do you have the most of on hand? Somehow, I ended up with four bottles of barbeque sauce.  I have no idea how.  It isn't something I even use once a month, but apparently, when I have a coupon, I'll buy anything.  I've been trying to think of a different way to use up some of this barbeque sauce, but one can only eat so much barbeque chicken pizza.  I always tend to think that whatever tastes good on pizza, would make a good pasta, too.  After doing some research, I decided to combine what sounded best from a bunch of recipes.  Here is what I came up with:

Ingredients:
- 16 oz. farfalle pasta
- 1 red, orange, or yellow pepper, diced
- 1 white onion, diced
- 1/2 cup turkey bacon, chopped
- 2 cloves of garlic, minced
- 8 oz. chicken, sliced
- 1 package fat-free cream cheese
- 1/2 cup barbeque sauce (I like it best with a smokey/mesquite bbq sauce; if you use a sweet or honey sauce, your sauce *will* end up very sweet.  As you can see in the picture, I used Sweet Baby Ray's, and it was too sweet.  I made it again with K.C. Masterpiece and thought the sauce was perfect!  Up to you, but I'm not a big sweet pasta sauce fan)
- 1/4 cup fat free ranch dressing
- 1/2 cup fat free half and half

Start by boiling a pot of water for the pasta.  Cook the pasta according to the package directions.


Meanwhile, heat a large skillet over medium to medium-high heat, and cook the peppers, onions, and bacon until the onions start to turn clear (but don't let them brown).  


Next, add in the sliced chicken, stirring frequently until chicken is no longer pink.  (At this point, I removed by chicken and put it in the food processor to shred it.  I am typically not a fan of big pieces of chicken in pasta, so I prefer mine shredded.  -Yes, I have texture issues...).  Next, add in the garlic, and cook for a minute or two until the garlic starts to brown.  Reduce the heat to low, and add drop in the cream cheese.  Cover with a lid for a few minutes until the cream cheese is melty.


Mix in the barbeque sauce, ranch dressing, and half and half .  Keep mixing until the sauce is uniform.  Drain the pasta, and carefully mix it into the skillet.


Serve immediately, or if for later use, put the pasta into the fridge immediately until ready to be reheated.  If you prefer baked pasta, transfer to an oven-proof dish, drizzle a little barbeque sauce and paprika on top of the pasta, and bake at 350* for 15 minutes.  


Enjoy!


Saturday, January 14, 2012

Cranberry white-chocolate chip oatmeal cookies

Today was a busy, busy day.  I was in a buy-a-lot-of-ingredients-and-crafting-materials kind of mood.  Unfortunately for me, I was also in a don't-spend-a-lot of money mood, too.  That meant I went to three different grocery stores, two craft stores, and one home improvement store to find the best deal on everything I was looking for.  It was a long day to say the least.  (And thanks to the crazy Pittsburgh weather, it was a wind chill of 3 degrees, making a day full of shopping, very very cold!)  I do think I was pretty successful though! In fact, I found a great deal on white chips and decided today was a perfect day to make my 'famous' white chocolate chip oatmeal cookies.  This is a recipe I made up this year when making Christmas cookies after I couldn't find one that I was looking for, and it has become my family's new favorite! My Dad has been requesting these, and I figured now was a great time to make them! If you like oatmeal cookies and cranberries, you will LOVE this recipe! I promise!

Recipe Yields 4 and 1/2 dozen cookies; Weight Watchers Info: 2 PPV per cookie

Ingredients:
3/4 cup butter flavored Crisco
3/4 cup sugar
3/4 cup packed brown sugar
2 eggs
2 tsp. vanilla
1 cup flour
1 tsp. baking soda
1 tsp. cinnamon
1/2 tsp. salt
2 and 3/4 cups oats, old fashioned
1 heaping cup dried cranberries
1 cup white chocolate chips cookies


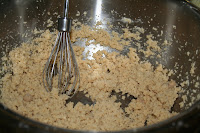
Begin by pre-heating the oven to 350*, and lining several baking sheets with parchment paper.  Next, place the crisco, sugar, and brown sugar in a large mixing bowl.  Beat with hand mixer on medium until crumbly.  It should look something like this.


Next, beat in the 2 eggs and vanilla until it forms a smooth batter.  It should look something like this.


In a small bowl, whisk together the flour, baking soda, cinnamon, and salt.  Add the flour mixture to the batter, and beat until smooth again making sure all dry ingredients are well incorporated.


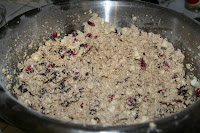
Once the batter is smooth, fold in the oats, cranberries and white chocolate chips using a wooden spoon.  Do not over mix the oats.  


Drop by spoonfuls onto prepared baking sheets.  Someday I will invest in a cookie scoop, but if you are like me and don't have one, use your fingers to shape 1" balls.  Keep cookies a few inches apart from one another as they will spread.


Bake in the oven for 10-12 minutes, or until the edges begin to brown.  Allow to fully cool on top of the baking sheets before storing.  I hope you enjoy them!!!


Friday, January 13, 2012

No-Sew pillow covers!

I don't sew.  In fact, I can't even sew on a button.  I have been married for two and a half years, and still, I take my husband's pants to my Mom for her to sew the buttons back on when they fall off.  Someday, I would like to learn how to sew.  I think I *might* even be good at it if I knew how to use a sewing machine.  The problem is, the last time I used a sewing machine was in my 7th grade home economics class.  7th grade was a long time ago.  Since then, I have tried using just a needle and thread for quick "fix-ups", such as trying to help with a bridesmaid strap emergency a few minutes before the wedding was supposed to start.  It didn't work.  The strap popped off.  So I used a paper clip.  (We really couldn't find any safety pins... We were desperate).  And the paper clip worked.  Paper clips are pretty cool inventions - you can bend them, twist them, and reshape them to pretty much hold anything that you need them to.  They are so much easier to use than a needle and thread.  


That is why when I decided I wanted to try to make myself some holiday no-sew pillow covers, I made sure to have my trusted paper-clips handy.  If you are like me, and don't sew, or maybe you do, but you are a busy lady and don't have time to sew, these pillow covers are for you! (And I have been on a decorate-my-house-for-every-holiday kick, so this was a great way to be able make that happen without having to succumb to paying the inflated prices the home stores are asking, just because the pillows happen to have some hearts on them...  Sorry.  Rant regarding inflammatory pricing has now ended).


Start with any square or rectangular pillow that you'd like to cover.  Pick a fabric, and cut the fabric to be three times as wide as the pillow, and two times as tall.

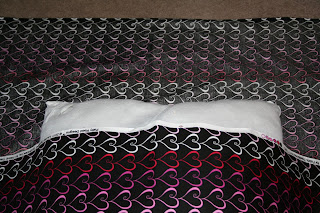
Place your pillow in the center of the fabric:


Fold the bottom half of the fabric up toward the middle:


Fold the top half down to meet the first half in the middle:


Fold the sides to form a triangle, by pinching the bottom right corner of the pillow, and fold diagonally toward the middle of the right side.  Repeat by pinching the top right corner of the pillow, and folding diagonally down toward the middle of the right side.  It should form a triangle, or a V shape.  They will probably overlap, and not line up perfectly.  That is okay.


Repeat this process on the left side.


Bring the right folded side to the middle, followed by bringing the left folded side to the middle so they are overlapping:


Next, tie the two ends into a knot:


Tuck the bottom tail of the knot up over where the flaps criss-cross, and then tuck in front of top tail. Next, bring the top tail down over the center, and tuck behind the knot.  Pull the fabric to make it look like a square knot.  Use two paperclips to secure the "knot" in place:  


Tug on the fabric to make it lay flat and square with the pillow.  Toss it on the couch, and enjoy! Here is a picture of the finished pillow, plus a smaller one that I covered in a complimentary print! I think they look pretty cute!

Thursday, January 12, 2012

Stuffed Shells - Taco Style

I had to spend a few days in the hospital due to complications with my Crohn's disease.  After not being allowed to eat food for a few days due to health issues, I wanted to make a dinner that would satisfy all of the cravings that occurred while surfing Pinterest for hours.  (If you ever have to spend a few days in the hospital, and can bring a lap top with you, I highly suggest playing around on Pinterest to pass the time... It did wonders for helping to take my mind off of the issues at hand -- and yes, gave me lots of new ideas for my blog!).

Anyway, for my first meal home, I knew exactly what I wanted.  I wanted ooey-gooey cheesy deliciousness combined with my two favorite foods loves: pasta and salsa.  I decided to try a new recipe I had come across tweaking to fit my tastes.  Taco Style Stuffed Shells fit my cravings perfectly! I've made something I call taco lasagna for a few years now that my husband and I really enjoy.  (It is actually the ONLY meal that he will eat as left-overs -- he is really picky!).  However, when I served him this tonight, he went back for seconds, thirds, and believe it or not, fourths! He couldn't get enough! I have to say, it is pretty darn delicious!  It takes a little extra time to prepare since you have to stuff each shell, but overall, start to finish, took me 45 minutes, with only 15 of those minutes as hands on time... Not too bad! I hope you enjoy!

Weight Watcher PPV: 3 PPV per shell

Ingredients:
- 16 jumbo pasta shells 
- 1 pound ground meat
- 1 packet taco seasoning
- 4 oz. fat free cream cheese
- A few dribble of taco sauce
- 1 jar chunky salsa (I used medium, but I'd recommend using mild if you are not a fan of spicy food)
- 1/2 cup taco sauce
- 1 handful colby jack shredded cheese
- 1 handful mexican shredded cheese


I began by boiling a large pot of salted water.  While it was coming to a boil, I browned the ground meat.  As it was browning, I prepared my 9x13 pan by spreading one cup of salsa on the bottom.


Once the meat was cooked and drained, I added in the packet of taco seasoning, 2/3 cup water, and the rest of the jar of salsa.  Once that was mixed well together, I dropped the cream cheese on top, put a lid on it, and waited until the cream cheese melted.  Once the water was boiling, I dropped the pasta shells into the water until they were tender.  When they were almost finished, I took the lid off of the meat, and mixed the cream cheese in with the taco meat until it was fully incorporated.  I then drained the shells, and ran them under cold water so they were cool enough to handle.


Next, I spooned the meat out using an ice cream scoop and filled each shell. I found the easiest and least messy way for me to do this was to spread the shell apart with one hand while it was sitting on a cutting board, and then dropping in the meat from the scoop.  It went really quickly this way.  


I then arranged the shells in the prepared 9x13 pan.  I then poured the taco sauce over top of all of the shells. I covered the pan with foil, and baked in the oven for 20 minutes.  After 20 minutes, I took them out, and sprinkled them with each of the cheeses.  I replaced the pan in the oven, uncovered, to allow the cheese to melt for about 5 minutes (you just want your cheese to be melted and gooey).


I served them with a sprinkle of the chopped green onions.  They were soooo good! See that whole big tray? They are gone.  All of them.  So much for having this for lunch tomorrow! 


Sunday, January 8, 2012

Lazy day Sun-dried Tomato Pasta

Today was one of those days that I didn't feel like cooking, but didn't feel like going out to eat, either.  I was perfectly content snuggling on the couch under my blanket, watching football, drifting on and off to sleep.  But, I figured, get up, make something quick and easy at half time, and then back to the comfort of the couch! 


Since it is cold today, and I'm tired and not feeling 100%, I was in the mood for comfort food.  Pasta and cheesy yumminess came to mind! I've had a half bag of sun-dried tomatoes that I've been wanting to use, and a bunch of almost-empty bags of cheese.  Time to get creative and still be done by the start of the third quarter? Challenge accepted! 

Here are the ingredients that I used: 
- 8 oz. dry cavatappi pasta
- 1/2 cup sun-dried tomatoes, julienned
- 1.5 cups fat-free half and half
- 3/4 cup fat-free mozzarella cheese, shredded
- 1/2 cup mozzarella cheese, shredded
- 1/3 cup grated parmesan cheese
- 1/3 cup grated romano cheese
- 1 tsp. dried basil (eye-balled)
- 1/4 tsp. garlic powder (eye-balled)
- a few shakes italian seasoning


First, I boiled a pot of water, and then added the pasta.  I then heated the half & half, basil, garlic powder, and italian seasoning in a small sauce pan over medium-high heat until it was almost boiling.  I then added each of the cheeses, whisking until each cheese was melted before adding the next cheese.  Once all cheeses were melted and incorporated, I switched the heat to low until I was ready to add the pasta.


When the pasta had about two minutes left, I added the sun-dried tomatoes into the boiling pasta and water. This helps to soften them so they are a perfect texture in your pasta.  I then drained the pasta and tomatoes, and added them to the pot of cheesy sauce.  I stirred until the pasta was well coated, and served immediately.  It was so yummy! And yes, I was on the couch, eating my dinner before the third quarter even started! A true lazy-cook's victory!