I have also decided to re-do my office, piece by piece, to go a grey, black, white, and pink theme. So far, I have only gotten to the re-organizing part. (Noticing a theme?). I made this really quick, really cute pencil holder. My first black/white/pink accessory!
I didn't do step-by-step pictures of this one, but if you're interested in making one, all I did was re-purpose a large tomato can. After removing the label and washing the can, I simply cut cardstock to fit the lip and inside of the can, and used modge podge to adhere it to the can. Next, I cut the black and white cardstock in a strip the exact size of the outside of the can, and again used modge podge to adhere it. Ta-da. Can to pencil holder for less than 50 cents!!!
In this ongoing process of 're-doing' my process, I also decided to stream line what I keep in my office. One of the things I decided no longer belonged in my office was our miscellaneous 'we need to address this' mail - you know the kind, something that isn't going to hang around long enough to file away, but something that needs to be addressed - maybe a bill, or a 'call us about...' letter... They were all just piling up on my desk and making me feel cluttered. So, I decided I needed an inbox that I could put in a central location that we could both access, so we could both address these annoying pieces of mail! How about the fridge? After my dry-erase schedule/menu planner that I made and hung on the right side of our fridge, I decided I would re-purpose a cereal box to make an inbox to hand on the left side that coordinated with the planner. Here is the fruit of those labors:
Step One: Cut the top flaps off of the cereal box. Then, cut two inch slits from the top along the sides, and then straight across to look something like this:
Step Two: Choose your paper. I used 12x12 scrap book paper. Fold it so that it will fit across the front of the box and cover around the sides like this:
Step Three: Wrap it around the box, and tape it (I just used scotch tape) like a present, covering down an inch or so on the inside of the box like this:
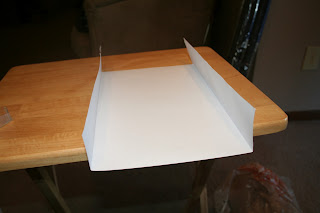
Step Four: Next, fold and cut another sheet of paper so that it will sit down inside of the box, covering the inside part that you see. This is kind of hard to describe, so hopefully this picture helps to show you how I folded and cut it:
Thanks for checking out my crafts today! Hope they inspired you to get crafting with the things you have laying around!


No comments:
Post a Comment